3D CAD modeling has become an important product design method for enterprises. Many beginners have just encountered a problem when they start to learn 3D CAD software. The 3D CAD software looks complicated and it is very difficult to learn. In order to lower everyone's learning threshold, today Xiaobian invited Li Gong, who has rich experience in 3D CAD design, to share with you 3D as an example, how to quickly realize 3D CAD modeling, let you just come into contact with 3D CAD software. You can also quickly draw beautiful mouse works!

Insert sketch 1 on the XZ plane, draw the curve as shown in Figure 1, exit the sketch, and create the XY datum at each end of the curve, as shown in Figure 2. Sketches 2 and 3 are inserted into the two reference planes respectively, and the two arcs shown in Figs. 3 and 4 are drawn. Click the drive curve to stake out, select the sketch 1 for the drive line, and select the sketches 2 and 3 for the contour to form the surface, as shown in Figure 5.
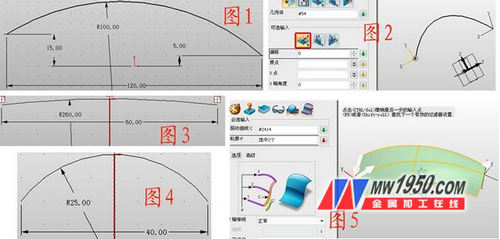
Insert sketch 4 on the XY plane, draw the graph shown in Figure 6, exit the sketch and stretch, pay attention to the selection of the base, the end point as long as the highest point of the surface is higher, as shown in Figure 7. Click on the shape--trim, the base is the stretched shape, and the trimmed surface is the curved surface. Note that the left side is ticked in front of the “extended trimming surfaceâ€, otherwise it may not be trimmed, as shown in Figure 8. Click Stretch--Decrement, the outline is the top surface of the mouse, and the parameters and effects are shown in Figure 9.
Hide the upper part of the mouse, and shell the lower part, the thickness is -2. Pay attention to the development surface, as shown in Figure 10. Insert the sketch 5 on the YZ surface, draw the circle with the right position, exit the sketch and stretch the circle. The draft angle, the boundary selects the side of the shell, so that it is convenient to remove the excess part. The premise of this function is to select the addition operation, the parameters are shown in Figure 11. Insert the sketch 6 on the XY plane, draw the graph as shown in Fig. 12, click the stretch--minus operation, and stretch, as shown in Fig. 13, similarly, perform the lateral stretching, and the effect is as shown in Fig. 14.


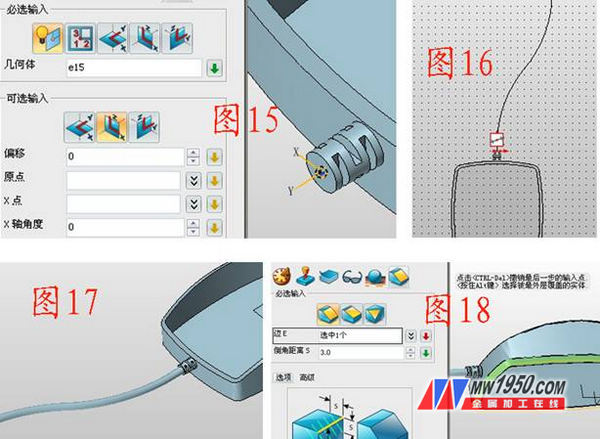
Insert the XZ reference plane at the position shown in Figure 15, and insert the sketch 7 on this side, draw the curve as shown in Figure 16, click on the rod sweep, the curve is sketch 7, the diameter is 4, and the effect is shown in Figure 17. Chamfer the bottom edge of the mouse, as shown in Figure 18.
For the upper part of the mouse, the thickness is -2, the effect is as follows, 19, click on the rounded corner - the ellipse fillet, round the upper edge of the mouse, the parameters and effects are shown in Figure 20. Insert the sketch 8 on the XY plane, draw the graph shown in Figure 21, and use the stretch-and subtraction stretch after exiting. The effect is shown in Figure 22. Click on the rounded corner - the ellipse angle to chamfer the round hole. The parameters and effects are shown in Figure 23.

Insert the sketch 9 on the XZ plane, draw the circle as shown in Figure 24, and stretch the circle. The parameters are as shown in Figure 25. Round the edge of the cylinder, as shown in Figure 26. Hide the other parts and edit the wheel separately. The center axis of the roller is inserted into the YZ reference plane.

Insert the sketch 10 on this side, draw the graph shown in Figure 28, click the rotation--subtraction operation, and perform the rotation cutoff. The parameters are shown in Figure 29. Set the filter as a feature, click on the array--circle, array the cut-out part, parameters and effects as shown in Figure 30, 31, display the hidden part, click on the visual style - face attribute, apply the mouse to your favorite The color, the final effect is as shown below.

At this point, the mouse model is basically completed, as long as you follow the tutorial step by step, you will find the clear 3D CAD operation process in the 3D, which can let you reduce the learning time of the 3D CAD software. Li Gong also provides the 3D CAD drawing of the mouse for free. (http://), it is also very helpful for users who have design requirements for the mouse at work!
Zhongwang 3D 3D CAD/CAM Free Download
Zhongwang 3D is the preferred brand of 3D CAD/CAM software for military enterprises recommended by the Ministry of Industry and Information Technology. It is a cost-effective 3D CAD/CAM integrated software, modeling, mold, assembly, reverse engineering, sheet metal, 2-5 axis machining, etc. Functional modules are readily available. It has the characteristics of strong compatibility, easy to learn and use, and makes 3D design easier. It provides 3D CAD/CAM genuine solution for enterprises. Welcome to download free 3D 2013 (), hotline: 4008-336-663.
Perforated Non-woven Fabric,Perforated Nonwoven Fabrics,Perforated Nonwoven Tablecloth
non woven fabric protection cover Co., Ltd. , http://www.nonwfabric.com